Thursday, April 23, 2015

A Good Moisturizer (How to Soften the Vinyl Seat)

About a month ago I noticed that the side of the bench seat was starting to crack.  As best I can tell, the seat is original or replaced over twenty years ago.  Either way the vinyl is not soft but not hard either.  It feels dry and you get the sense that over a short period of time the seat will start cracking in several places because of its dryness.  

Of course I did some research and tried to learn about vinyl plastisol.  Basically I wanted to "re-soften" the seat.  I eventually went to my local auto part store and looked for something that would do the job.  

I ended up selecting Meguiar's Ultimate Black Plastic Restorer.  

Honestly I was doubtful that this would do the trick but it was worth a try.  I spent about 30 minutes rubbing in the liquid with a soft cloth twice.  The first immediate result was shiny vinyl.  Then over the next few weeks I really noticed the "softness" of the seat.  

So far my only complaint is that the seat has become slippery.  In fact if I take a fast hard right while driving I can "slide" my wife over to me, that part is not a complaint but a great dating move!

I suspect that over time the slippery part will lessen.  Overall the product did what it advertised and I am pleased.  


Update November 2020:  The seat is no longer slippery like before and has not shown any additional wear.  I will probably reapply again this winter.

Tuesday, April 21, 2015

Swollen and Cracked (Replacing Belts Gaskets and Hoses)

Ever since I got the truck I have planned on replacing the hoses and fan belt since the hoses were swollen and cracked as was the belt.  I figured I would jump on the replacement quickly since they were an easy job to complete.  However it also seems that easy jobs get put off for the same reasons I think I'll tackle them.

I got the truck in fall of 2013 and focused on brakes and the fuel system.  By the time winter rolled around I was tired of smelling like gas and oil from crawling underneath. Then spring came and I started working on cosmetic items. Summer was busy and then my Dad died in August.

So for some reason this weekend I decided to tackle an easy job to get back into the project.

I swung by NAPA and showed them a picture of the old fan belt.  The guy looked in the system and found a cross referenced part.  He then casually mentioned that my fan belt had been out of production for 15 years.

This may be the easiest repair I have done yet.  A quick turn of a wrench on two bolts on the generator moved it closer toward the engine block and loosened the tension on the belt so it could be removed.  Repeat in reverse and the new one was just as quickly installed.


An inspection revealed that the old belt was not on its last legs but did have some cracking and some separation and honestly might have lasted 5 more years.

I went for a test drive and retested the tension and found it to be as solid as then I first put it on.  


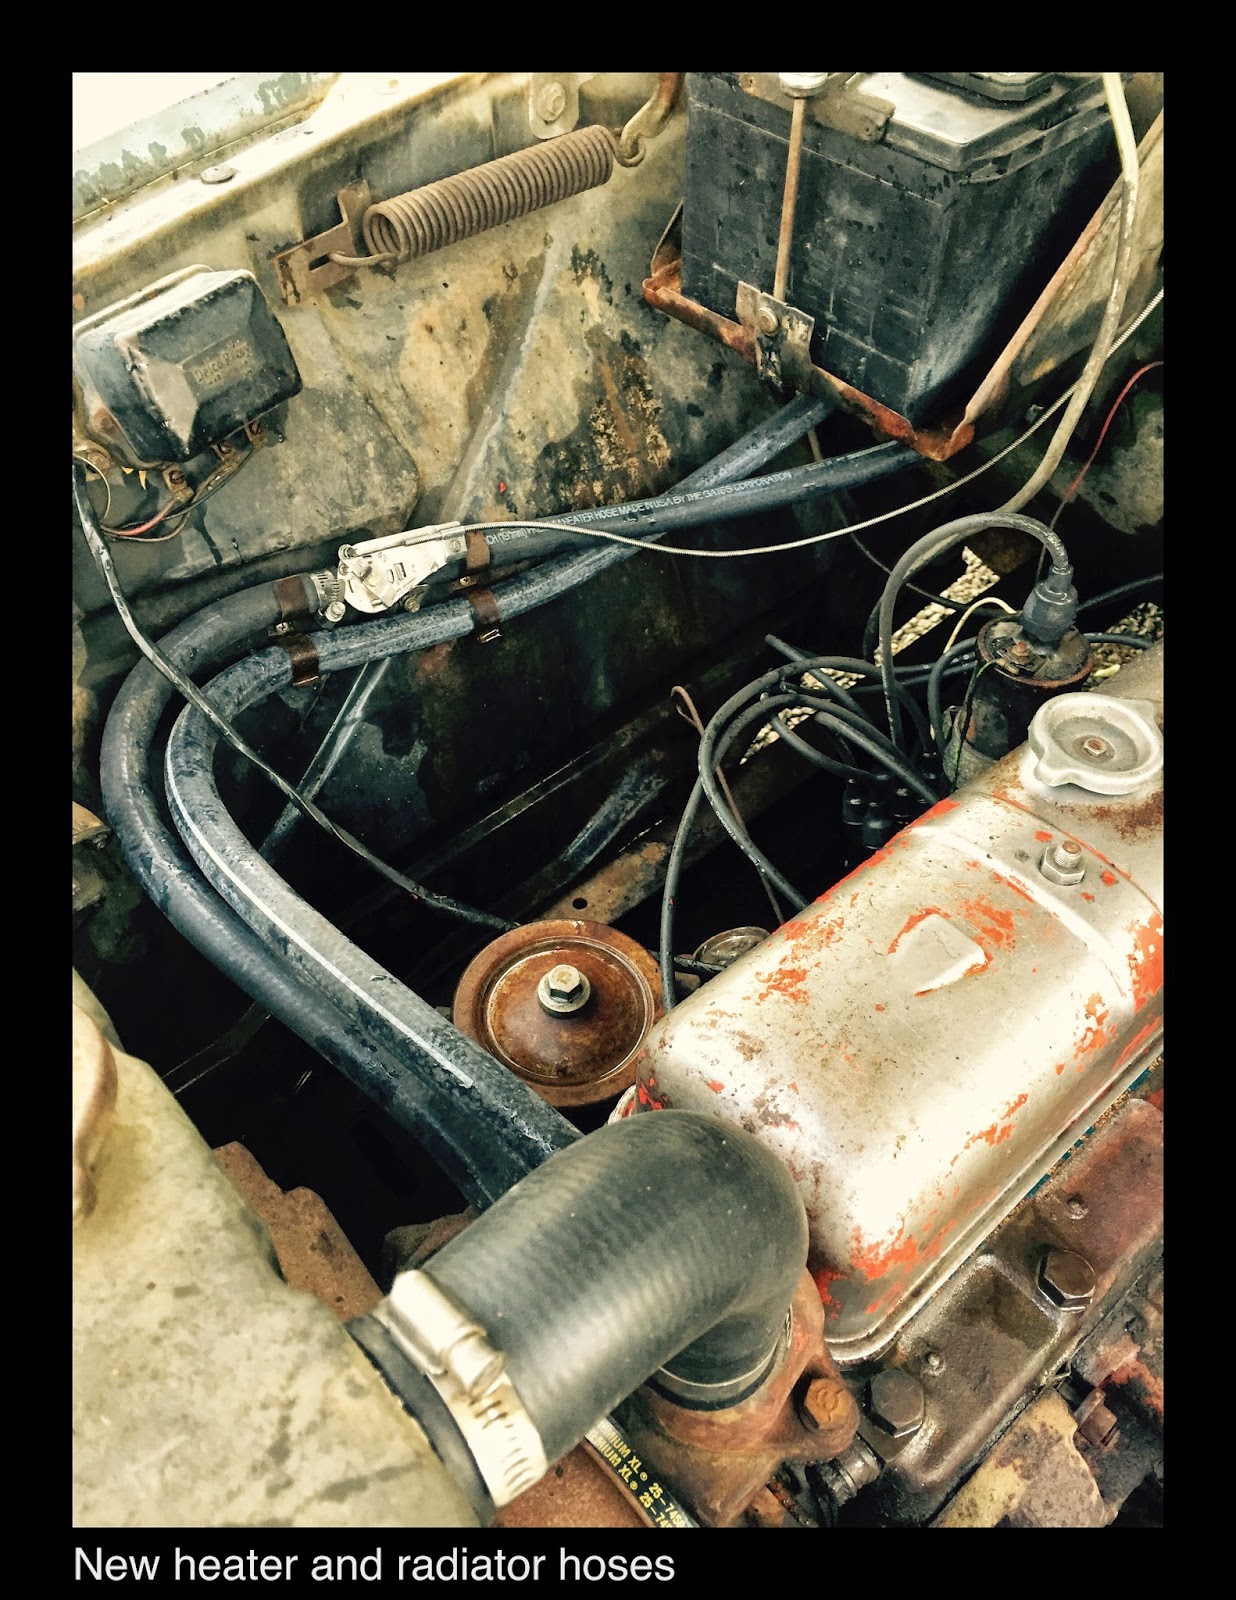
Sunday after church I decided to replace my heater hoses, and both upper and lower radiator hoses.  The lower one in particular was swollen and showed lots of cracks.  I started with draining the system through the two drain cocks.  Again I was pleasantly surprised that the drains moved easily and did their job as expected. I drained into a 5 gallon bucket  to capture most of the fluid which was green and had a bit of brown in it. 

As I loosened the hoses only the upper was easy to remove.  The lower radiator and the heater hoses all required me to carefully slice the rubber so I could peel back the ends from the connections. A few modifications to the hoses for proper fit and I was pleased with the reassembly.  

I also took off the heater valve controller to give it a good clean up and then again reattached all the hoses.  Nothing was seemingly out of order or required additional repair.  Although I did consider a water pump replacement at this time, instead I'll just wait for its failure or telltale leaking.

Last year I noticed more oil leaks than usual on the ground and discovered that the valve cover gasket was leaking.  The front and back of the cover seemed to be the points leaking the most and again were nothing significant to tackle, just annoying and messy.

I had avoided this job because I was frankly afraid of what I might find under the cover.  Giant chunks of debris, metal shavings, and possibly a barnacle or two could be lurking.  Which would mean a fear of valve replacements and or an entire engine rebuild.  Neither were attractive to me so I did the obvious head in sand routine.

Since I was already doing the hoses I figured perhaps I could take a peek under the covers and at least replace the gasket and if it was bad under there I could park the truck and consider my options before summer was over.
I took off the cover and found to my surprise nothing as great as my fears.  I did find one tiny multidimensional "rock" of oil/debris that was no bigger than the end of a small flat blade screw driver and of course a few items from lifting the cover off.  The biggest "thing" was that some of the components have a off-white color on them.  If you look carefully at the photos you can see what I mean.  Crazy thing is that I put everything back together and never thought about trying to wipe or scrape to she if it was paint, or a contaminated layer of oil.  I assume that they are painted parts, slightly aged in color from the oil and heat.

I cleaned and inspected the gasket area and valve cover.  Using some fuel I cleaned the inside and outside of the cover to remove any other grime and oil residue.  

I am a novice at all this so perhaps I missed something and will regret it later but I saw oil and nothing more.  It was not cloudy or light brown, suggesting water, nor were there any crustations or "chunks" baked on.

The new cork gasket laid down as expected and the cover dropped on easily.  After it was tightened down I noticed some oil leaking on the driver side near the front.  I wiped it up and it seemed to be holding. 

I might remove the cover sometime this summer to repaint but again I was not looking for a painting project and the corresponding controversy of paint colors and ability to hold up to heat over time.

The day was mostly spent using a putty knife and large flat blade screwdriver to remove as much oil/grease/dirt from the block, starter and oil pan.  This happens to be the second time I have done this, so each time I am able to see a little bit more of the paint and metal of the old 270.


Wednesday, June 4, 2014

Window to the Soul (Replacing Window seals)

A beautiful weekend in Southern Oregon and for the foreseeable future.  This was the encouragement I needed to start my next project. Replacing the rubber mold on the vent windows and the felt channels on the main windows.

Let me first start with a warning.  This was the most frustrating project to date and I'm glad its over.

I assume that most folks reading this blog are mechanically inclined so I won't try to provide a detailed step-by-step write-up but instead offer some tips and observations.

The basic premise of course is to undo the old broken stuff and then put in the new stuff, I wish it had been that simple.

Step One:
This was my first mistake.  Had I manged to watch the video called "Door window/vent installation 1955-59 Chevy/GMC Truck" on YouTube I would have saved hours of time, frustration and bits of skin.

So I first removed the door and window handles, followed by the interior door panel. This was going to be easy.  Next I went to remove the window regulator, door latch mechanism and screws holding the vent window. 

1959 GMC truck 1959 GMC truck


After breaking off the heads of some of the clutch style screws, and spending the next hour or so drilling and tapping, you will now enter the bowels of the door cavity.  This is where you stick you hands into a place that you can't really see and there are moving parts that may cut off bits of fingers.  

At this point you will mange to somehow get the window off the roller guides and window regulator, its like a Rubiks cube made out of leftover metal parts that have purpose.

Next you will need to remove the four screws that hold the metal tabs around the vent window, but be careful as they seem to be made out of leftover pot-metal and will strip easily.  I was fortunate as one vent window only had a single screw holding it in and the other only had two.  I can only assume that some poor soul had ventured into this project before.  Also be careful not to lose the screws into the door as it will be lost into a toxic pile of rust and tree decay, on the other hand you might as well go buy some real screws to replace the ones missing or the ones you drop.


1959 GMC truck 1959 GMC truck

Step Two:
With three boys running around this was a good time to make sure the windows were protected and would not be stepped on or knocked over.  

1959 GMC truck 1959 GMC truck


Next I decided to focus on cleaning and lubing the window regulator.  This was a fairly straight forward task and required the normal wire brush for rust removal.  I tried for sometime to remove the strange mating call caused by the main spring and was unsuccessful.  I can only assume that this was designed by the GMC Truck and Coach Division engineers as a warning to make sure your head or fingers were not in the way of the moving glass.  

Why you ask?  Because in the YouTube video I mentioned his did the same thing and he did it right!


Step Three:
Now I went to the main window.  Nothing seemed to be done really except to clean it up.  Done.  However now that I am enlightened I would have removed the two clutch style bolts that held the guide in place (on other side of window in photo).  Upon install this would be the holy grail I was seeking.
 

As I reflect on why I did not remove those screws, I still get a shiver down my spine at the thought of removing two more rusted screws requiring another 45 minutes to destroy and fix.

Step Four:
Ok now we are getting to the fun stuff.  I started with trying to remove the old rubber from the vent window.  Razor blades and small flat blade screwdrivers will be your tools of choice.  When I say rubber what I really mean is that black stuff that oscillates between concrete and brittle plastic after 45 years of sunshine.  The primary focus on this task is to NOT slice your hands or fingers with the razor blade or puncture your palm with the screw driver.

1959 GMC truck 1959 GMC truck


The last two steps are to remove 4 rivets that hold a vertical seal and the process of releasing the vent window from the assembly so the new rubber seal can be put into place.  I unfortunately chose the wrong one to start first.

With the assembly held in place in my vice I grabbed my drill and began to remove the rivets.  This tip concerns using the right drill bit instead of the one that was already in the drill.  In doing so you will create a hole that is to large for the new rivet to fit into.  Learn from this and don't do it on the next window.

1959 GMC truck 1959 GMC truck

With all the rubber like stuff finally removed I now went to work on releasing the vent window from the assembly.  It seems simple enough.  Remove nut on shaft of vent window, lefty loosey.  After several minutes of confusion, various rust removal chemicals and a wire brush I finally had a epiphany.  The nut is held tight with what I call the "panty liner" washer.  It has wings to hold the nut in place.

1959 GMC truck 1959 GMC truck


Once I figured this out the spring, washers and bits of rust all came off.  There are a few more washer type things to remove but you can't get to these until the opposite end is removed first because the shaft is too long.

Anyway, the next part is a bit scary as the only way I could figure out how to remove the vent window was to pull up and slightly bend the metal frame to allow the pivot stud to slide out.  It works.  

As you pull out the shaft remember which way the parts go or you will spend more time having to figure out how the "comma" washer goes.  Its purpose is to prevent you from opening the vent to far. I call it the comma washer cause it looks like a comma.

With that I was able to clean up the shaft and other parts nicely and was half way done, in steps, not time.

Step Five:
One of the best tips was to put liquid dish soap on the new rubber mold so that it slides easily only the metal frame.  Works like a charm and allows you to wash your hands and get a drink at the same time.

Then it came time to put in the new vertical seal and rivets.  Since I made a mistake earlier with the drill I had to place the rivets in the opposite direction.  It looks nice and does not seem to be an issue except for one vent window that is slowly grinding the glass down to make room for the raised rivet head.  Small issue to me.  The photo shows the rivet sticking up because I have not yet set it into place.

1959 GMC truck 1959 GMC truck

With the new rubber it was looking good and I felt encouraged that perhaps the dark days were behind me.

Step Six:
Installing the vent window through the new rubber mold was tricky as the clearance from before was even less now.  Which means I had to bend the frame even more to get the pivot point stud in place.  Again this work to my amazement.  I found out later that when I installed the assembly I would be able to manipulate the frame back into position for each tab and screw.  It will make sense later when you do this yourself.

Put back the various washers and spring then finger tighten the nut.  At this point you need to test the vent to make sure it is tight enough to hold the vent open when driving down the road but not to tight that it requires two hands to open.  Once satisfied push the wings back into place and you are done with that.

Step Seven:
The main window is suppose to be held into place by the felt channel that runs from the bowels of the door up along the side and curves to the top.  So when you drive down the road the window is held in position by this channel weather rolled up or not.

I read an article about this some place and so I started with a test fitting and cutting the channel to the right length and then gluing the channel in place inside the door only.  

Step Eight:
I will not bore you with the details of this next step except to remind you to watch the YouTube video to know how to easily install the window properly.  

During step eight I manged to drop the window and window regulator several times into the cavern of the door.  Keep in mind that as I did this each time the recently lubed rollers and guides would now pick up dust and rust like cat hair on suede suit.  After many tries I manged to get all three rollers in the right spots and and the vent and main window to live side by side.

1959 GMC truck 1959 GMC truck

Then I realized that I made a mistake.  The new felt channel is suppose to have these 4 metal tabs that attach with two prongs.  It might seem like no big deal but its like trying to stick a gummy bear on a dogs tail.  Enough said, and the next window I was smarter.

The photos above show the old channel that has lost its cloth cover, but the tabs are clear.


Step Nine:
This is the final step and I highly recommend that you do this BEFORE any window is installed.  They are called inner and outer wipes.  These thin strips of metal with felt attached on one side and four "button" on the other.  The primary issue is that these buttons are in theory suppose to lineup with the corresponding four holes in the door.

Apparently either GMC did not have a standard to hole spacing or the aftermarket part is for the wrong truck.  I was vindicated later watching the YouTube video and he also had the same issue.

The fix requires grinding and "shaping" the buttons to fit.  Without a window to get into the way it is easy to do this, however once you have installed the window you will now find that the clearance is VERY limited and will require a faith that you might not have.  

Had I been doing this on a newly painted door I can tell you I would be very concerned and hesitant to install these wipes.

Final Thoughts
This ended up being a two day project and lots of slices and scratches to reach my health deductible for the year.  However the result was immediate and wonderful.  Driving down the road I can talk with my wife without yelling, unless I want to and the water stays out.  

The down side is that I can now hear the engine and other mechanical bits that I am not use to hearing and not sure if they are about to fall apart.


Tuesday, May 27, 2014

Memorial Reflections (A full weekend of cleaning up)

1959 GMC truck
This Memorial weekend we stayed close to home and I took advantage of the sun and perfect temperature to tackle some truck issues. The first was to finish the cleaning and waxing of the truck body. The final result looks real nice. Of course now I have to consider some "repair" work on the real bad spots. I used the tent to keep me cool during the day and since it was a long weekend I was able to work on it for three long days.

1959 GMC truck 1959 GMC truck

1959 GMC truck 1959 GMC truck


Deluxe Heater
1959 GMC truck heater blower motor
Blower motor sits on top of the unit above.
I also went after the deluxe heater controls and corresponding blower motor. The problem is that some of the controls are stiff and one does not move at all. I also suspect that the blower motor is dead. I first tried to remove the control panel for the heater. That was fairly easy except for the hidden screws up top and behind the panel that secures it to the dash cutout. It was a fairly reasonable cleanup and a few lubrication points. I then took each cable, removed them, and cleaned all the rust off and then used a bicycle lubricant to loosen them further. A few adjustments to get them just right and I have a working control panel, except for the blower. The blower removal forced me to destroy the glove box in the process. Fortunately it was in need of replacement anyway. The blower appears to not turn well as it is stiff and has lots of resistance. I tried some oil to loosen it up, but I think a new one is the best route. 

The photos below show before and after shots.  The majority of the issue was the fine red dust from the years spent in Gold Country. The mechanical components make it real easy to work with.  No plastic to break or rivets to remove, just good old screws and washers.

1959 GMC truck heater control panel 1959 GMC truck heater control panel


The dash gauges were next. light bulbs replaced, and a wire wheel to the gauge panel removed all traces of paint. I realize that it does not look original but at this moment it is a real low priority. The left panel in the photo is all cleaned while the right side is still peeling paint.  I also replaced the flasher unit and a 9amp fuse. A cleaning of the dash and all interior surfaces was a time consuming task, and not yet complete.

1959 GMC truck gauges


The following are some shots I took that captured some nice features of the truck. I have been asked what camera I use.  Its an iPhone 4.  I run all my photos for the black border and a few modifications to bring out the detail from shadows in a app called Camera+. The blurred backgrounds are using the focus lock feature on the phone.  My favorite is the water temp gauge which reflects the blue sky and green tree.

1959 GMC truck gear shift knob 1959 GMC truck dash
1959 GMC truck odometer 1959 GMC truck temp gauge sky and tree reflection

1959 GMC truck side mirror reflection

A good friend also encouraged me to get an authentic 1959 era Oregon license plate.  It is a light mint green with dark green numbers.  The registration shows December 1960. 

1959 GMC truck with Oregon Plates from 1959